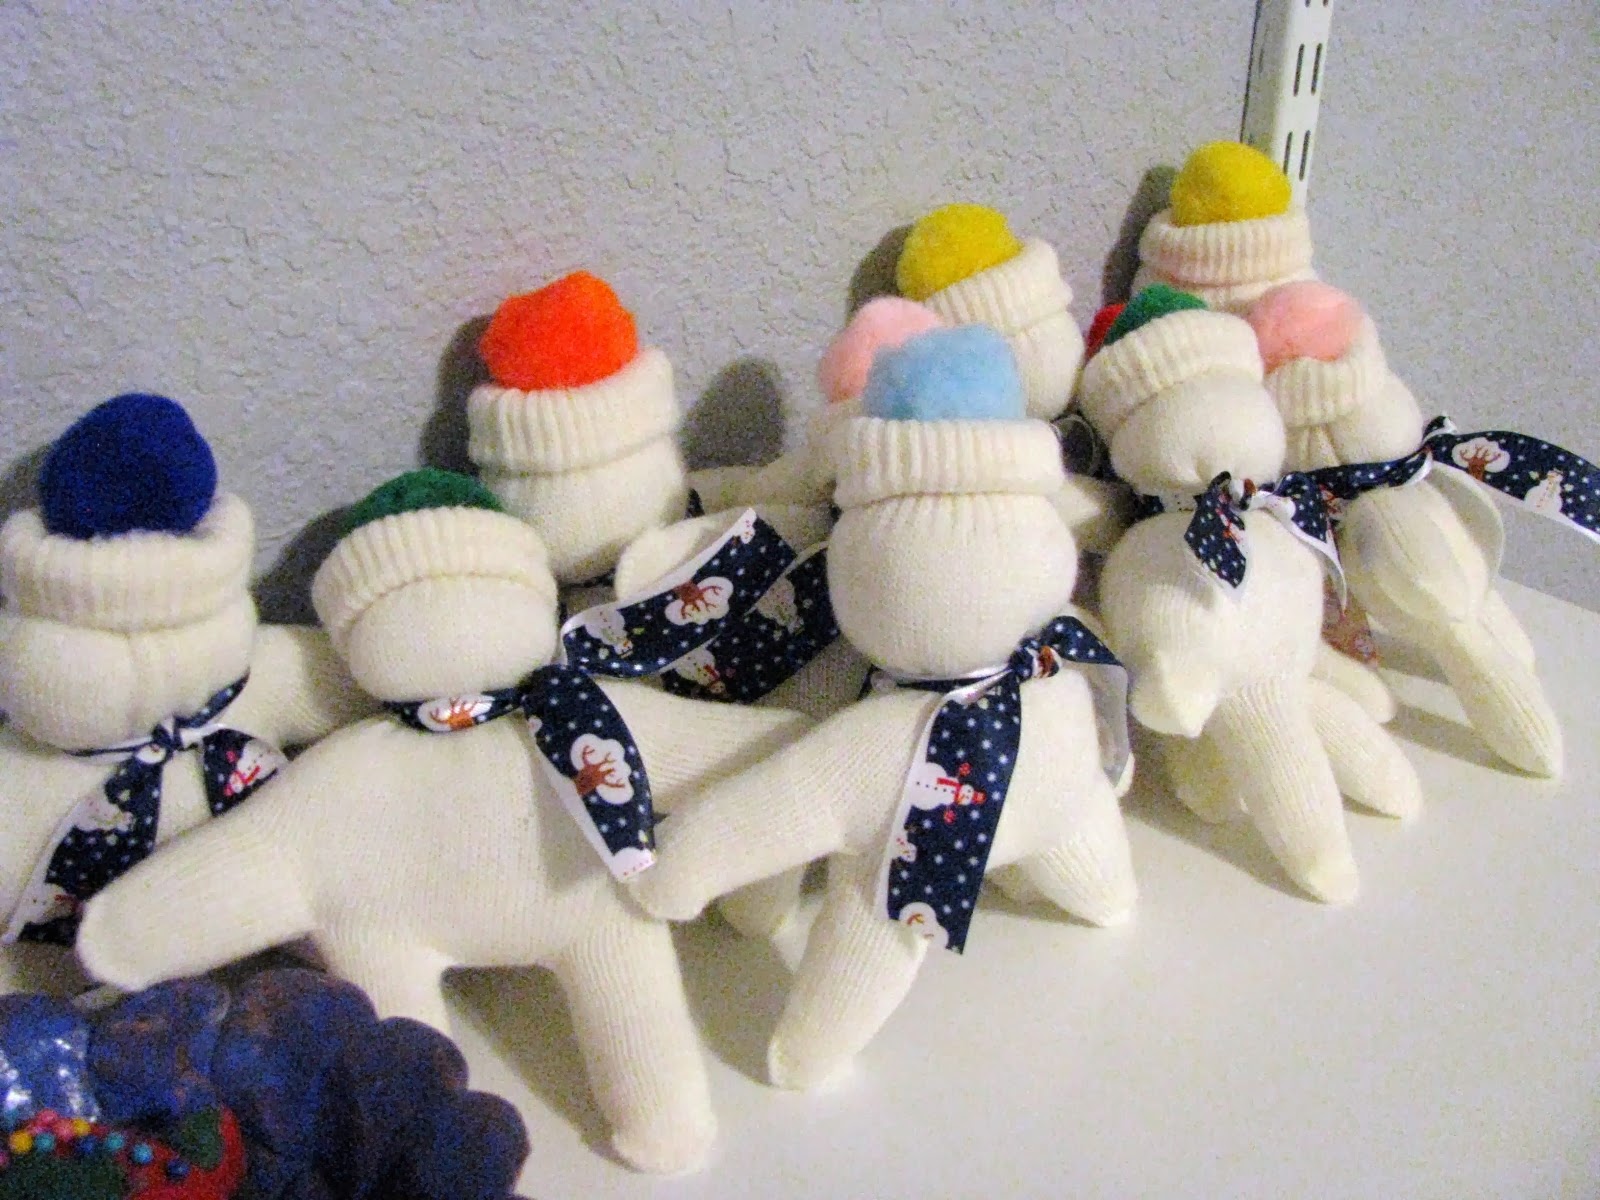
Friday, November 29, 2013

Thanksgiving 2013, in pictures

Turkey Trotters still smiling after 5 miles!
 A tired Girl, relaxing at the firepit
 Happy Hubby
Hubby and a tired Girl...
Wine for dinner: pinot noir - a suggestion overheard in the HEB wine department..
Boys plugged in and kicked back...for now.
Roasted turkey, waiting to be carved.  So very good!!
Making a pumpkin dump cake.
The firepit was a favorite place to stop by and relax at.
Scout, getting ready to play some cards on the patio.
The boys, throwing Skywinder in the empty street, apparently having a great time!
Our family Christmas card attempt...more on that later.  I'm thinking it requires a re-do...


Wednesday, November 27, 2013

A thankful tablescape

 Our mealtime prayer, when we all sit together:

For food, for raiment,
For life, for opportunity,
For friendship and fellowship,
We thank thee, O Lord.
Amen.
Philmont grace - Boy Scouts of America
 
And thinking of that made me want to do a little something for each place setting at our Thanksgiving table.
I typed what we are most thankful for this time of year- food, life, family, opportunity - in different typefaces, then cut each out, and laid on top of a solid color napkin, just under the clear plates.  These plates have been in use at our house for years...
 I also tied some pretty ribbon on each wine glass.  
The teenagers can drink soda out of theirs!
 Each one is different because I was using up scraps.
 And lastly, I added the sparkly glittery leaves I bought at the hospital gift shop and some 99 cent mercury votives I bought at Tarjay a couple Christmases ago.
 All that's left to do is get all the flatware clean and placed at each setting.
It's simple.  I love it.
So much to be thankful for - tomorrow, and always.


Monday, November 25, 2013

Mealplan Monday #86 and the tale of a tablecloth

I'm trying to be frugal with Thanksgiving, keeping things simple and use things I already have for decor.  It's fun to look at others' ideas, but I have to stay true to what is best for my own home, you know?
This table centerpiece is a glass hurricane I already had, with a new candle ($3) set with an old crochet doily on a gold charger and wrapped with wired Fall ribbon.  I had a hard time finding that ribbon - note to self to buy Fall decor next year in September!  I have some glittery leaves I bought last year on clearance form the hospital gift shop...might add those to the table scape, too.
******
Monday - Bacon Pancakes, hot chocolate
Tuesday - Mexican Chili Chicken Lasagna, salad
Wednesday - Take Out/Turkey Day prep
Thursday - Turkey and Cornbread dressing, gravy, Orange Cranberry Sauce, Green Bean Casserole, Sweet Potatoes, Corn Casserole, Bourbon Orange Pecan Pie, Pumpkin Pie Dump Cake, wine
Friday - Turkey Soup, plus smoked brisket for our tree trimmin' lunch!
Saturday - Leftovers or some other simple dinner- Christmas Parade Day!
Sunday - Stouffer's, corn
******
 This year, there's just the six of us and I don't plan on cooking as much food as last time.  I'd rather not have the hassle trying to stuff leftovers into a too-full fridge and freezer and spending an hour and a half cleaning up the kitchen at 10 p.m...  That was not fun.  Plus, there's the Turkey Trot, so I am sticking with the tried-and-true dishes we love - just not as many of them.
I did, however, want the dining table to look pretty and formal for us.  I found a beautiful, simple cream tablecloth at a thrift store and spread it out to see how it looks.  Hmm.  Too long, unless we needed to put in an extra leaf or two, which we won't this year.
After I eye-balled it, I trimmed off the excess tablecloth.  Then I stitched a very tight hem along all of the edges so they would all match.
 
 I think my custom tablecloth is purty.  And the cream color is the perfect background for so many holidays.  Good job, me!
The trimmed off fabric will go directly to my scraps box and be put to good use.
Can't wait to enjoy a meal with my WHOLE family!


Friday, November 22, 2013

Fun thrift finds for November

I've had a bit of fun lately stopping by thrift shops while out running errands.  On one occasion, I was actually looking for work shirts for Hubby - usually I just look at everything - but I was on a mission that day.
I found him 6 shirts in great shape for $29 and a some other odds and ends.
Including this very sweet Santa mug which looks like handpainted pottery.  I think I paid a dollar or two for it.  On another day, I was finally able to stop into the Assistance League's thrift store and had so much fun pawing through the vintage finds!
They had one half of the store dedicated to Christmas and they were doing a good business that day.
I didn't really mean to get caught up in the Christmas of it all - there was just so much of it!  It was like going to your grandmother's garage and rooting around.  Some of it, I felt, was overpriced, some was really reasonable.  I ended up with some fun, old yarn embellished ornaments and a ball one that is marked "1975 Decorna"  - wonder what it's worth?
I love  it - a sweet Santa and a decopage look.
I also ended up with two like-new silk ties for Hubby for $1 each, and a crocheted afghan for $8, plus the tablecloth for our holiday table.  That's about all the thrifting I can afford to do for a while, but it sure was fun!  What about you?  Been thrifting lately?


Wednesday, November 20, 2013

Sweet Little Snowmen tutorial

I know we haven't had Turkey Day yet, and I refuse to decorate for Christmas until then, but I have to start thinking about gifts and budgeting and such, and I so wanted to make some handmade things this holiday season.  I found the instructions for these cute little cutes years ago - from a craft book for kids, I think.  One year I made them for co-workers. We don't get a lot of snow here, but they are fun and festive.
I decided to make them again this year.  Want to see how I did it?  Here goes:
You will need several pairs of those cheap white gloves from JoAnn - they are about $1 a pair.  Also a bag of fiberfill, some assorted sizes of pom poms, some skinny rick rack, some decorative 1/2" ribbon, hot glue, rubberbands, and some small googly eyes.
 Turn the glove inside out and pull the middle finger through.
I used my machine to stitch across the base of the finger - but you could do a hand stitch, or even fabric glue.  No need to trim it off.
 When you turn the glove right side out again, the finger is missing and there's a nice straight line there.  Do you see two arms, and two legs?  Good!
Now you will stuff your glove with fiberfill - not too full, but nice and plump!
I stuff all the way to the cuff, then tie a rubber band around the top of the "body" just above where the palm of the glove is.  You can check and make sure your snowman is as plump as you'd like at this point.
 Then I put another small rubber band at the base of the cuff and fold it over, completing the head and making the edge of a hat.  Say hello to my leetle friend...
 Tie a cute ribbon as a scarf around the neck to hide that rubberband, then hot glue a pom pom onto the top of the hat. 
 I made all of these snowmen in about a hour.  And that included hunting for my glue gun.
 Glue on the googly eyes and a small pom pom for the nose.
Add some rick rack to the hat to make it more festive.  You can attach the "hands" with a safety pin, or a some thread and tuck a treat in there.  You could also attach an ornament hanger and let someone find him with his treasure, hanging on your tree. 


Shared with:
http://hopestudios.blogspot.com/2013/11/tutorial-tuesday_19.html